Introduction to GitLab CI/CD

In this post I will show you the basics of using gitlab as a Continuous Integration and Continuous Deployments (CI/CD) tool.
What Is a GitLab?
GitLab is a collaborative DevOps platform and open source code repository for large software development projects. GitLab provides an online code storage location, as well as CI/CD and issue tracking capabilities.
GitLab pipelines are the basic building blocks of CI/CD—a pipeline is a top-level component for continuous integration and delivery/deployment. A pipeline includes the following components:
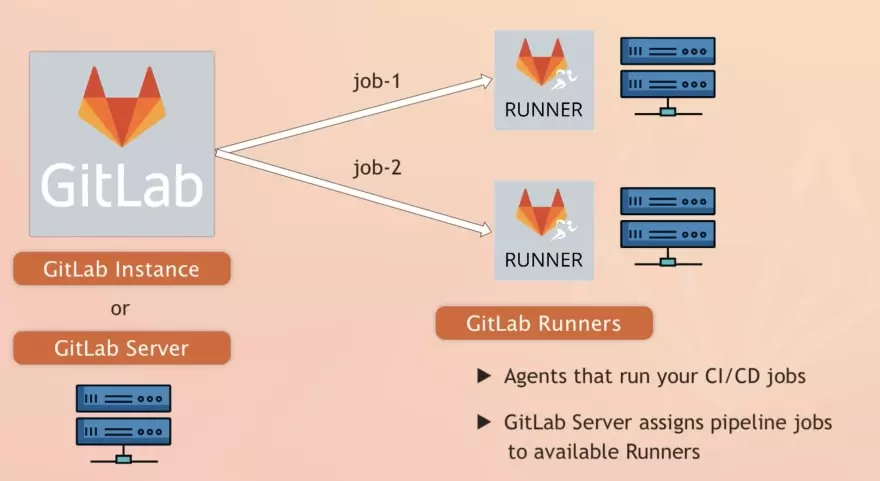
- Jobs — these define the desired actions, such as compiling or testing code. A runner executes each job, and you can run multiple parallel jobs if you have concurrent runners.
- Stages — these determine when each job runs, such as the code compilation stage followed by the test running stage.
Create a Project on GitLab
First, we need to create a project on GitLab. A Project is represent a git repository to store your code. You can run Gitlab on your own hardware or use the Gitlab.com the cloud service of Gitlab. In a previous post I showed how to install an on-premise Gitlab server.
Gitlab Runners
Gitlab runners, re separate machines connected to the Gitlab server, which are actually the ones executing the pipelines.
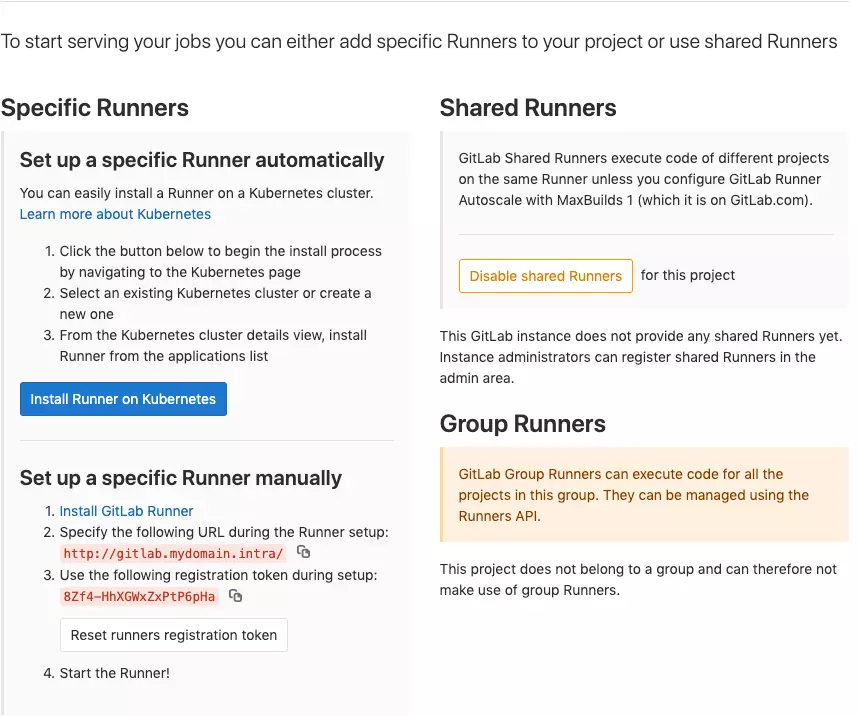
Gitlab.com cloud service offers pre-installed runners to use. On a self hosted Gitlab server you need to create your own. To Install a new self hosted runner is easy. You just select the Settings > CI/CD menu in your project and select Runners. You need tp copy the registration token from the Set up a specific runner manually menu:
Then on a linux Server install the runner:
sudo curl -L --output /usr/local/bin/gitlab-runner https://gitlab-runner-downloads.s3.amazonaws.com/latest/binaries/gitlab-runner-linux-amd64

sudo chmod +x /usr/local/bin/gitlab-runner

# add local user for the runner
sudo useradd --comment 'GitLab Runner' --create-home gitlab-runner --shell /bin/bash

sudo gitlab-runner install --user=gitlab-runner --working-directory=/home/gitlab-runner
sudo gitlab-runner start
Register the runner to the Gitlab Server. Change <REGISTRATION-TOKEN> to the token ypu previously copied.
sudo gitlab-runner register -n \
--url https://gitlab.mydomain.intra/ \
--executor docker \
--docker-privileged \
--docker-image "docker:stable" \
--docker-volumes "/var/run/docker.sock:/var/run/docker.sock" \
--registration-token <REGISTRATION-TOKEN>
This will register a docker based runner in Gitlab. This means all the build and pipeline job will run in a docker container. Of course to do this you need to install docker engine on your runner. In a previous post I shoved how to install Gitlab Runners in an Openshift environment.
Create a YAML Configuration File for CI/CD
Gitlab use a file called .gitlab-ci.yml to configure your CI/CD pipeline.
Below is a snippet of what your .gitlab-ci.yml file should look like:
image: docker:stable

variables:
  DOCKER_TAG_LATEST: $CI_REGISTRY_IMAGE/$CI_COMMIT_REF_NAME:latest
  DOCKER_TAG_COMMIT: $CI_REGISTRY_IMAGE/$CI_COMMIT_REF_NAME:$CI_COMMIT_SHORT_SHA

cache:
  paths:
    - node_modules/

stages:
  - build
  - deploy

build:
  image: docker:latest
  stage: build
  services:
    - docker:dind
  tags:
    - docker
  script:
    - echo "Starting to build"
    - docker build -t $DOCKER_TAG_COMMIT -t $DOCKER_TAG_LATEST .
    - docker login -u gitlab-ci-token -p $CI_BUILD_TOKEN $CI_REGISTRY
    - docker push $DOCKER_TAG_COMMIT
    - docker push $DOCKER_TAG_LATEST
    - echo $DOCKER_TAG_COMMIT

deploy:
  image: alpine:latest
  stage: deploy
  tags:
    - docker
  script:
    - echo "Starting to deploy"
    - chmod og= $SSH_PRIVATE_KEY
    - apk update && apk add openssh-client
    - ssh -i $SSH_PRIVATE_KEY -o StrictHostKeyChecking=no $SERVER_USER@$SERVER_IP "docker login -u gitlab-ci-token -p $CI_BUILD_TOKEN $CI_REGISTRY"
    - ssh -i $SSH_PRIVATE_KEY -o StrictHostKeyChecking=no $SERVER_USER@$SERVER_IP "docker pull $DOCKER_TAG_COMMIT"
    - ssh -i $SSH_PRIVATE_KEY -o StrictHostKeyChecking=no $SERVER_USER@$SERVER_IP "docker container rm -f my-project || true"
    - ssh -i $SSH_PRIVATE_KEY -o StrictHostKeyChecking=no $SERVER_USER@$SERVER_IP "docker run -d -i -p 3000:3000 --name my-project $DOCKER_TAG_COMMIT"
  environment:
    name: production
    url: http://$SERVER_IP
  only:
    - main
Here is a quick overview of how each part works to aid the deployment process:
The image defines the Docker image to be used:
image: docker:stable
In the variables section, you’re creating two tags for the Docker image. The DOCKER_TAG_LATEST variable will add the latest tag to the latest built Docker image, while the DOCKER_TAG_COMMIT variable will use the first eight characters of the commit SHA to tag the Docker image.
The cache defines the file or list of files that should be cached between subsequent runs.
cache:
  paths:
    - node_modules/
The stages define the order of jobs that would be in the pipeline. Here, there are two stages of the build and deploy as seen above.
stages:
  - build
  - deploy
build:
  image: docker:latest # Defines the Docker image to be used
  stage: build # The stage assigns the current job to the build stage.
  services: # link to another docker image. This allows you to use the Docker executor to build your Docker image.
    - docker:dind
  tags: # run on runner with tag docker
    - docker
  script: # In script sou add the command that the build will execute. In this case we build a docker image and used the built-in variables to login and push the image to the Gitlab docker registry.
    - echo "Starting to build"
    - docker build -t $DOCKER_TAG_COMMIT -t $DOCKER_TAG_LATEST .
    - docker login -u gitlab-ci-token -p $CI_BUILD_TOKEN $CI_REGISTRY
    - docker push $DOCKER_TAG_COMMIT
    - docker push $DOCKER_TAG_LATEST
    - echo $DOCKER_TAG_COMMIT
The Deployment job is similar to the build except the fallowing snippet.
  environment:
    name: production
    url: http://$SERVER_IP
  only: # can run only on main branch
    - main
  dependencies: # only runs if the build job is successful
  - build
Start a CI/CD pipeline
To activate the pipeline you need to place the .gitlab-ci.yml file in the root of your git repository.
cd myrepo
nano .gitlab-ci.yml
git add -A
git commit -m "add .gitlab-ci.yaml"
git push
At the web-ui go to sour project and select CI/CD > pipelines menu to check your pipeline. It will start automatically.