Flagger NGINX Canary Deployments

In this blog post, I will show you how you can install Flagger and use it to set up progressive delivery for the podinfo app to your Kubernetes cluster.
Parts of the K8S Gitops series
- Part1: GitOps solutions for Kubernetes
- Part2: ArgoCD and kubeseal to encript secrets
- Part3: Argo CD Image Updater for automate image update
- Part4: Flux2 Install and Usage
- Part5: Flux2 and kubeseal to encrypt secrets
- Part6: Flux2 and Mozilla SOPS to encrypt secrets
- Part7: Flagger NGINX Canary Deployments
What is Flagger
Flagger is a progressive delivery operator for Kubernetes that resolves the outlined problem by gradually shifting traffic to the new release while monitoring configured metrics. It can perform automated analysis and testing on the new release, deciding whether to propagate it to the whole cluster or stop if issues are found. Flagger slowly increases the load on the new release while keeping the old one available, ensuring minimal downtime. It can send notifications to Slack, Microsoft Teams, and other platforms to notify you and your team of transpired events.
Prerequisites
- nginx ingress controller
- flagger
- flagger-loadtester
- prometheus
helm repo add flagger https://flagger.app

helm upgrade -i flagger flagger/flagger \
--namespace ingress-nginx \
--set prometheus.install=true \
--set meshProvider=nginx
helm repo add ingress-nginx https://kubernetes.github.io/ingress-nginx
kubectl create ns ingress-nginx
helm upgrade -i ingress-nginx ingress-nginx/ingress-nginx \
--namespace ingress-nginx \
--set controller.metrics.enabled=true \
--set controller.podAnnotations."prometheus\.io/scrape"=true \
--set controller.podAnnotations."prometheus\.io/port"=10254
Deploying an App
kubectl create ns test

kubectl apply -k https://github.com/fluxcd/flagger//kustomize/podinfo?ref=main
kubectl get pods -n test
#Output
NAME                       READY   STATUS    RESTARTS   AGE
podinfo-78fd6c49bf-jsjm5   1/1     Running   0          18s
podinfo-78fd6c49bf-k2nh4   0/1     Running   0          3s
Now that the pods are running, you’ll create an Ingress to expose the app at your domain. Open a file called podinfo-ingress.yaml for editing:
nano podinfo-ingress.yaml
---
apiVersion: networking.k8s.io/v1
kind: Ingress
metadata:
  name: podinfo
  namespace: test
  labels:
    app: podinfo
spec:
  ingressClassName: nginx
  rules:
    - host: "app.k8s.mydomain.intra"
      http:
        paths:
          - pathType: Prefix
            path: "/"
            backend:
              service:
                name: podinfo
                port:
                  number: 80
Before you create the canary, you’ll need to deploy Flagger’s load tester, which allows canary resources to test releases by sending HTTP requests.
kubectl apply -f podinfo-ingress.yaml

helm install flagger-loadtester flagger/loadtester -n test
Note that the podinfo service does not yet exist in your cluster. It will be created later by Flagger automatically as part of the canary.
nano podinfo-canary.yaml
---
apiVersion: flagger.app/v1beta1
kind: Canary
metadata:
  name: podinfo
  namespace: test
spec:
  provider: nginx
  targetRef:
    apiVersion: apps/v1
    kind: Deployment
    name: podinfo
  ingressRef:
    apiVersion: networking.k8s.io/v1
    kind: Ingress
    name: podinfo
  progressDeadlineSeconds: 60
  service:
    port: 80
    targetPort: 9898
  analysis:
    interval: 10s
    threshold: 10
    maxWeight: 50
    stepWeight: 5
    metrics:
    - name: request-success-rate
      thresholdRange:
        min: 99
      interval: 1m
    webhooks:
      - name: acceptance-test
        type: pre-rollout
        url: http://flagger-loadtester.test/
        timeout: 30s
        metadata:
          type: bash
          cmd: "curl -sd 'test' http://podinfo-canary/token | grep token"
      - name: load-test
        url: http://flagger-loadtester.test/
        timeout: 5s
        metadata:
          cmd: "hey -z 1m -q 10 -c 2 http://app.k8s.mydomain.intra/"
kubectl apply -f podinfo-canary.yaml
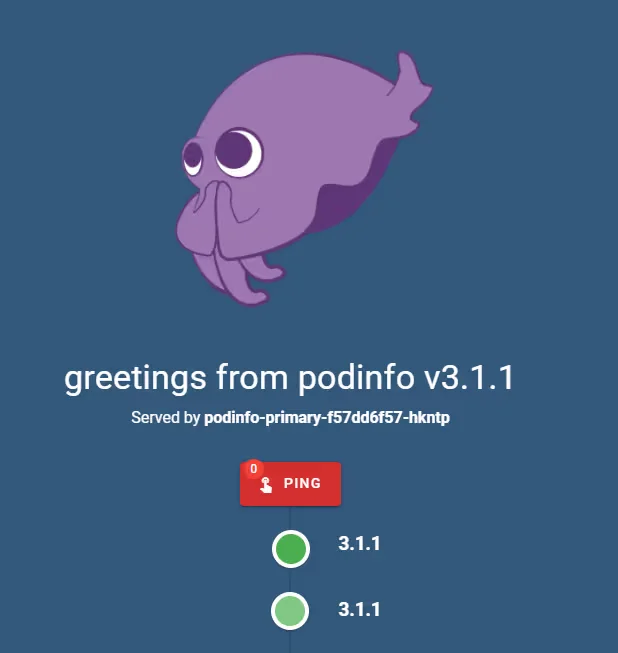
You can now navigate to app.k8s.mydomain.intra. You’ll see the podinfo app:
You can press the Ping button to refresh version numbers of other pods. Run the following command to set a different version of podinfo:
kubectl set image deployment/podinfo podinfod=stefanprodan/podinfo:6.0.3 -n test
Flagger will detect that the deployment revision number changed, which you can check by listing the events associated with the podinfo canary:
kubectl describe canary/podinfo -n test
#Output
Events:
  Type     Reason  Age                From     Message
  ----     ------  ----               ----     -------
  Normal   Synced  117s               flagger  New revision detected! Scaling up podinfo.test
  Warning  Synced  107s               flagger  canary deployment podinfo.test not ready: waiting for rollout to finish: 0 of 2 (readyThreshold 100%) updated replicas are available
  Warning  Synced  97s                flagger  canary deployment podinfo.test not ready: waiting for rollout to finish: 1 of 2 (readyThreshold 100%) updated replicas are available
  Normal   Synced  87s                flagger  Starting canary analysis for podinfo.test
  Normal   Synced  87s                flagger  Pre-rollout check acceptance-test passed
  Normal   Synced  87s                flagger  Advance podinfo.test canary weight 5
  Warning  Synced  67s (x2 over 77s)  flagger  Halt advancement no values found for nginx metric request-success-rate probably podinfo.test is not receiving traffic: running query failed: no values found
  Normal   Synced  57s                flagger  Advance podinfo.test canary weight 10
  Normal   Synced  47s                flagger  Advance podinfo.test canary weight 15
  Normal   Synced  37s                flagger  Advance podinfo.test canary weight 20
  Normal   Synced  27s                flagger  Advance podinfo.test canary weight 25
Return to your browser and watch the version numbers flicker as the app continually refreshes itself.
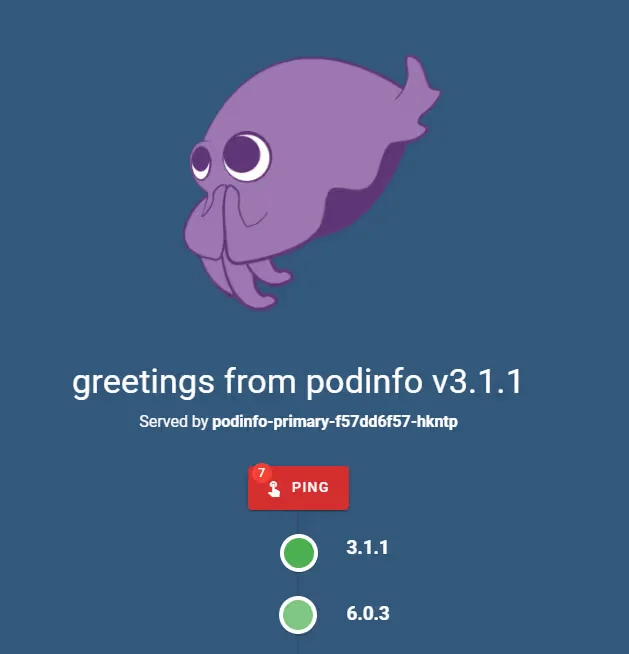
Flagger denotes the traffic shifts with events starting with Advance podinfo.test canary weight, followed by the percentage of traffic being diverted:
kubectl describe canary/podinfo -n test
#Output
Output
...
  Normal   Synced  116s                  flagger  Advance podinfo.test canary weight 10
  Normal   Synced  106s                  flagger  Advance podinfo.test canary weight 15
...
After some time, the canary deployment should succeed and the version numbers will stabilize:
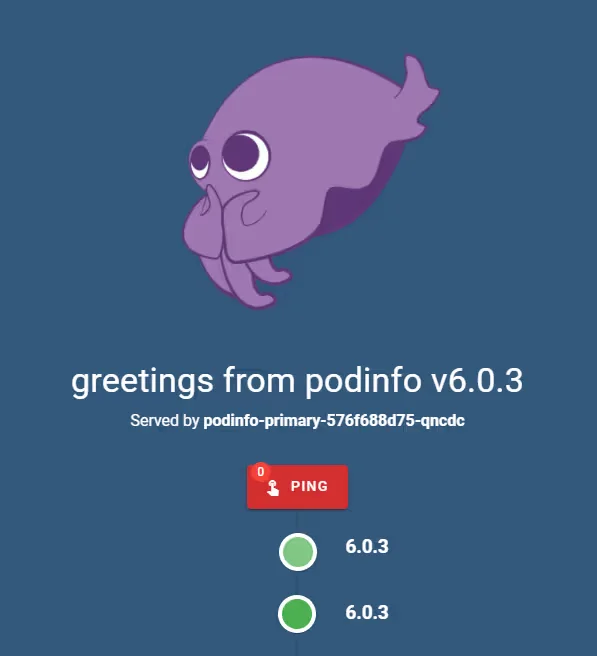
The final event log of the canary will look similar to this:
kubectl describe canary/podinfo -n test
#Output
Events:
  Type     Reason  Age                   From     Message
  ----     ------  ----                  ----     -------
  Normal   Synced  2m56s                 flagger  New revision detected! Scaling up podinfo.test
  Warning  Synced  2m46s                 flagger  canary deployment podinfo.test not ready: waiting for rollout to finish: 0 of 2 (readyThreshold 100%) updated replicas are available
  Warning  Synced  2m36s                 flagger  canary deployment podinfo.test not ready: waiting for rollout to finish: 1 of 2 (readyThreshold 100%) updated replicas are available
  Normal   Synced  2m26s                 flagger  Starting canary analysis for podinfo.test
  Normal   Synced  2m26s                 flagger  Pre-rollout check acceptance-test passed
  Normal   Synced  2m26s                 flagger  Advance podinfo.test canary weight 5
  Warning  Synced  2m6s (x2 over 2m16s)  flagger  Halt advancement no values found for nginx metric request-success-rate probably podinfo.test is not receiving traffic: running query failed: no values found
  Normal   Synced  116s                  flagger  Advance podinfo.test canary weight 10
  Normal   Synced  106s                  flagger  Advance podinfo.test canary weight 15
  Normal   Synced  96s                   flagger  Advance podinfo.test canary weight 20
  Normal   Synced  86s                   flagger  Advance podinfo.test canary weight 25
  Normal   Synced  76s                   flagger  Advance podinfo.test canary weight 30
  Warning  Synced  16s                   flagger  podinfo-primary.test not ready: waiting for rollout to finish: 1 old replicas are pending termination
  Normal   Synced  6s (x6 over 66s)      flagger  (combined from similar events): Routing all traffic to primary
Reporting to Slack
You can configure Flagger to send its logs to your Slack workspace. To use Slack integration, you’ll need to have an incoming webhook on Slack for your workspace.
To do so, first log in to Slack and navigate to the app creation page. Pick a name that you’ll recognize, select the desired workspace, and click Create App.
You’ll be redirected to the settings page for the new app. Click on Incoming Webhooks on the left navigation bar.
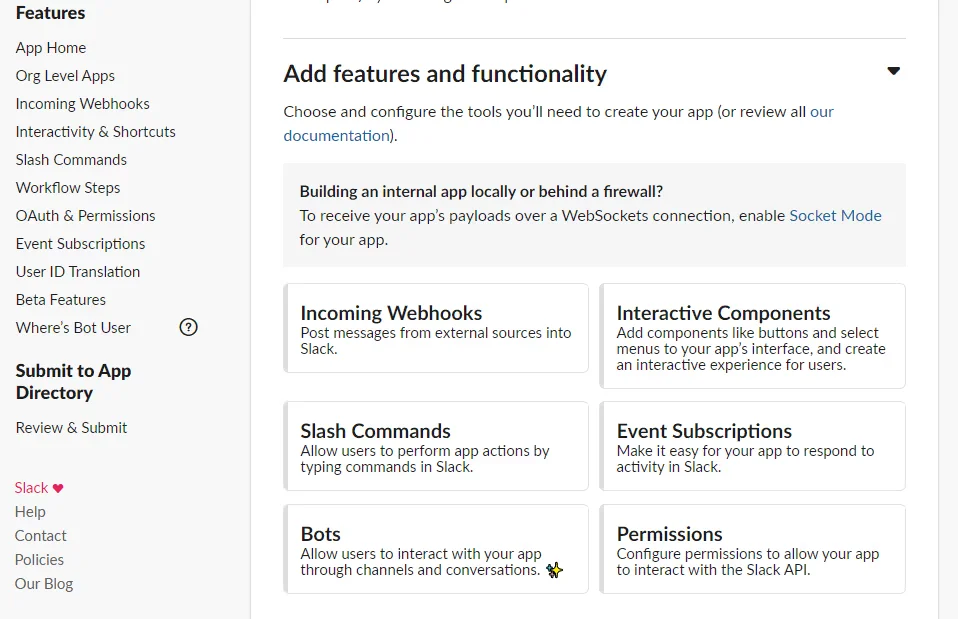
Enable webhooks by flipping the switch button next to the title Activate Incoming Webhooks.
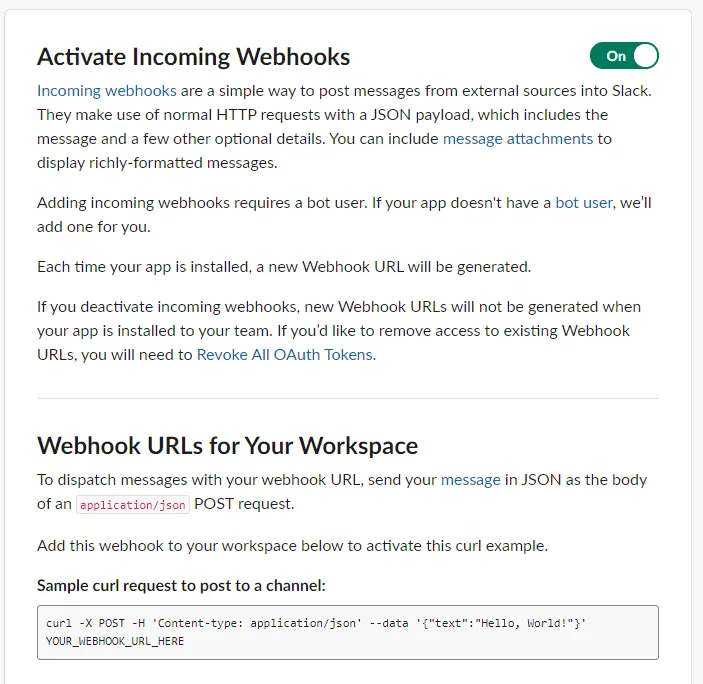
To configure Flagger to send logs to Slack, you’ll need to update its Helm release by running:
helm upgrade flagger flagger/flagger \
--reuse-values \
--set slack.url=<your_hook_URL> \
--set slack.channel=<your_channel_name> \
--set slack.user=<username>
kubectl set image deployment/podinfo podinfod=stefanprodan/podinfo:3.1.1 -n test
You’ll soon see messages appearing in Slack:
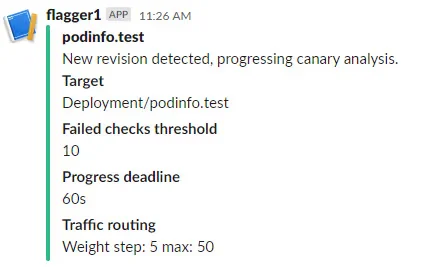
When this release deploys, you’ll see a success message:

For the new release, deploy the 6.0.3 version again by running:
kubectl set image deployment/podinfo podinfod=stefanprodan/podinfo:6.0.3 -n test
Run the following command to create a large number of HTTP 500 statuses:
watch curl http://app.your_domain/status/500
After some time, you’ll see that Flagger decided not to apply the new release.