Configure Openshift In-Tree vSphere Cloud Provider
Page content
In this post I will show you how can you use vmware for persistent storagi on Openshift.
Parts of the Openshift series
- Part1: Install Opeshift
- Part2: How to Enable Auto Approval of CSR in Openshift v3.11
- Part3: Add new workers to Openshift cluster
- Part4: Chane the certificates of the Openshift cluster
- Part5: LDAP authentication for Openshift
- Part6: Keycloak SSO authentication for Openshift
- Part7: Gitlab SSO authentication for Openshift
- Part8a: Ceph persistent storage for Openshift
- Part8b: vSphere persistent storage for Openshift
- Part9: Helm on Openshift
- Part10: Tillerless Helm on Openshift
- Part11: Use external docker registry on Openshift
- Part12: Secondary router on Openshift
- Part13a: Use Letsencrypt on Openshift
- Part13b: Install cert-managger on Openshift
- Part14: Create Openshift operators
- Part15: Convert docker-compose file to Opeshift
- Part16a: Opeshift elasticsearch search-guard error
- Part16b: Openshift: Log4Shell - Remote Code Execution (CVE-2021-44228) (CVE-2021-4104)
vSphere Configuration
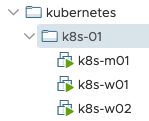
- Create a folder for all the VMs in vCenter
- In the navigator, select the data center
- Right-click and select the menu option to create the folder.
- Select All vCenter Actions > New VM and Template Folder.
- Move Openshift vms to this folder
- The name of the virtual machine must match the name of the nodes for the OpenShift cluster.

Set up the GOVC environment:
# on deployer
curl -LO https://github.com/vmware/govmomi/releases/download/v0.20.0/govc_linux_amd64.gz
gunzip govc_linux_amd64.gz
chmod +x govc_linux_amd64
cp govc_linux_amd64 /usr/bin/govc
echo "export GOVC_URL='vCenter IP OR FQDN'" >> /etc/profile
echo "export GOVC_USERNAME='vCenter User'" >> /etc/profile
echo "export GOVC_PASSWORD='vCenter Password'" >> /etc/profile
echo "export GOVC_INSECURE=1" >> /etc/profile
source /etc/profile
Add disk.enableUUID=1 for all VM:
govc vm.info <vm>
govc ls /Datacenter/kubernetes/<vm-folder-name>
# example:
govc ls /Datacenter/kubernetes/okd-01

govc vm.change -e="disk.enableUUID=1" -vm='VM Path'
# example:
govc vm.change -e="disk.enableUUID=1" -vm='/datacenter/kubernetes/okd-01/okd-m01'
VM Hardware should be at version 15 or higher. Upgrade if needed:
govc vm.option.info '/datacenter/kubernetes/okd-01/okd-m01' | grep HwVersion

govc vm.upgrade -version=15 -vm '/datacenter/kubernetes/okd-01/okd-m01'
Create the required Roles
- Navigate in the vSphere Client - Menu > Administration > Roles
- Add a new Role and select the permissions required. Repeat for each role.
| Roles | Privileges | Entities | Propagate to Children |
|---|---|---|---|
| vcp-manage-okd-node-vms | Resource.AssignVMToPoolVirtualMachine.Config.AddExistingDisk, VirtualMachine.Config.AddNewDisk, VirtualMachine.Config.AddRemoveDevice, VirtualMachine.Config.RemoveDisk, VirtualMachine.Config.SettingsVirtualMachine.Inventory.Create, VirtualMachine.Inventory.Delete | Cluster, Hosts, VM Folder | Yes |
| vcp-manage-okd-volumes | Datastore.AllocateSpace, Datastore.FileManagement (Low level file operations) | Datastore | No |
| vcp-view-okd-spbm-profile | StorageProfile.View (Profile-driven storage view) | vCenter | No |
| Read-only (pre-existing default role) | System.Anonymous, System.Read, System.View | Datacenter, Datastore Cluster, Datastore Storage Folder | No |
Create a service account
- Create a vsphere user, or add a domain user, to provide access and assign the new roles to.
Configure ansible installer
nano /etc/hosts
openshift_master_dynamic_provisioning_enabled=true
openshift_cloudprovider_kind=vsphere
openshift_cloudprovider_vsphere_username=<vCenter User>
openshift_cloudprovider_vsphere_password=<vCenter Password>
openshift_cloudprovider_vsphere_host=<vCenter IP OR FQDN>
openshift_cloudprovider_vsphere_datacenter=<Datacenter>
openshift_cloudprovider_vsphere_datastore=<Datastore>
openshift_cloudprovider_vsphere_folder=<vm-folder-name>
Add providerID
nano openshift-vmware-pacher.sh
DATACENTER='<Datacenter>'
FOLDER='<vm-folder-name>'
for vm in $(govc ls /$DATACENTER/vm/$FOLDER ); do
  MACHINE_INFO=$(govc vm.info -json -dc=$DATACENTER -vm.ipath="$vm" -e=true)
  # My VMs are created on vmware with upper case names, so I need to edit the names with awk
  VM_NAME=$(jq -r ' .VirtualMachines[] | .Name' <<< $MACHINE_INFO | awk '{print tolower($0)}')
  # UUIDs come in lowercase, upper case then
  VM_UUID=$( jq -r ' .VirtualMachines[] | .Config.Uuid' <<< $MACHINE_INFO | awk '{print toupper($0)}')
  echo "Patching $VM_NAME with UUID:$VM_UUID"
  # This is done using dry-run to avoid possible mistakes, remove when you are confident you got everything right.
  kubectl patch node $VM_NAME -p "{\"spec\":{\"providerID\":\"vsphere://$VM_UUID\"}}"
done

chmod +x openshift-vmware-pacher.sh
./openshift-vmware-pacher.sh
Run the Installer
# deployer
cd /usr/share/ansible/openshift-ansible/
sudo ansible-playbook -i inventory/hosts.localhost playbooks/prerequisites.yml
sudo ansible-playbook -i inventory/hosts.localhost playbooks/deploy_cluster.yml

# If installastion failed or went wrong, the following uninstallation script can be run, and running installation can be tried again:
sudo ansible-playbook -i inventory/hosts.localhost playbooks/adhoc/uninstall.yml
Create vSphere storage-class
nano vmware-sc.yml
kind: StorageClass
apiVersion: storage.k8s.io/v1
metadata:
  annotations:
    storageclass.kubernetes.io/is-default-class: "true"
  name: "vsphere-standard"
provisioner: kubernetes.io/vsphere-volume
parameters:
    diskformat: zeroedthick
    datastore: "NFS"
reclaimPolicy: Delete

oc aplay -f vmware-sc.yml
