Use Multus CNI in Kubernetes
In this post I will show you how you can use Multus CNI to create Kubernetes pods with multiple interfaces.
What is Multus?
Multus CNI is a container network interface plugin for Kubernetes that enables attaching multiple network interfaces to pods. In Kubernetes, each pod has only one network interface by default, other than local loopback. With Multus, you can create multi-homed pods that have multiple interfaces. Multus acts a as ‘meta’ plugin that can call other CNI plugins to configure additional interfaces.
Install a default network
Our installation method requires that you first have installed Kubernetes and have configured a default network – that is, a CNI plugin that’s used for your pod-to-pod connectivity. After installing Kubernetes, you must install a default network CNI plugin. In this demo I will use Flannel for the sake of simplicity.
# install flanel:
wget https://raw.githubusercontent.com/flannel-io/flannel/master/Documentation/kube-flannel.yml
nano kube-flannel.yml
...
        args:
        - --ip-masq
        - --kube-subnet-mgr
        - --iface=enp0s8

kubectl apply -f kube-flannel.yml
Install Multus
Now we can install Multus. The recommended method to deploy Multus is to deploy using a Daemonset, this spins up pods which install a Multus binary and configure Multus for usage.
kubectl apply -f https://raw.githubusercontent.com/k8snetworkplumbingwg/multus-cni/master/deployments/multus-daemonset-thick-plugin.yml

kubectl get pods --all-namespaces | grep -i multus
You may further validate that it has ran by looking at the /etc/cni/net.d/ directory and ensure that the auto-generated /etc/cni/net.d/00-multus.conf exists. Check the multus binary is exists under /opt/cni/bin.
ll /opt/cni/bin/
total 98044
-rwxr-xr-x. 1 root root  3254624 Sep  9  2020 bandwidth
-rwxr-xr-x. 1 root root  3581192 Sep  9  2020 bridge
-rwxr-xr-x. 1 root root  9837552 Sep  9  2020 dhcp
-rwxr-xr-x. 1 root root  4699824 Sep  9  2020 firewall
-rwxr-xr-x. 1 root root  2650368 Sep  9  2020 flannel
-rwxr-xr-x. 1 root root  3274160 Sep  9  2020 host-device
-rwxr-xr-x. 1 root root  2847152 Sep  9  2020 host-local
-rwxr-xr-x. 1 root root  3377272 Sep  9  2020 ipvlan
-rwxr-xr-x. 1 root root  2715600 Sep  9  2020 loopback
-rwxr-xr-x. 1 root root  3440168 Sep  9  2020 macvlan
-rwxr-xr-x. 1 root root 42554869 Jan 15 10:44 multus
-rwxr-xr-x. 1 root root  3048528 Sep  9  2020 portmap
-rwxr-xr-x. 1 root root  3528800 Sep  9  2020 ptp
-rwxr-xr-x. 1 root root  2849328 Sep  9  2020 sbr
-rwxr-xr-x. 1 root root  2503512 Sep  9  2020 static
-rwxr-xr-x. 1 root root  2820128 Sep  9  2020 tuning
-rwxr-xr-x. 1 root root  3377120 Sep  9  2020 vlan
Create NetworkAttachmentDefinition
The first thing we’ll do is create configurations for each of the additional interfaces that we attach to pods. We’ll do this by creating Custom Resources. Each configuration we well add is a CNI configuration. If you’re not familiar with them, let’s break them down quickly.Here’s an example CNI configuration:
cat <<EOF | kubectl create -f -
apiVersion: "k8s.cni.cncf.io/v1"
kind: NetworkAttachmentDefinition
metadata:
  name: macvlan-conf
spec:
  config: '{
      "cniVersion": "0.3.0",
      "type": "macvlan",
      "master": "enp0s9",
      "mode": "bridge",
      "ipam": {
        "type": "host-local",
        "subnet": "172.17.9.0/24",
        "rangeStart": "172.17.9.240",
        "rangeEnd": "172.17.9.250",
        "routes": [
          { "dst": "0.0.0.0/0" }
        ],
        "gateway": "172.17.9.1"
      }
    }'
EOF
cniVersion: Tells each CNI plugin which version is being used and can give the plugin information if it’s using a too late (or too early) version.master: this parameter should match the interface name on the hosts in your cluster. Can not be the same interface used by the default network!!!type: This tells CNI which binary to call on disk. Each CNI plugin is a binary that’s called. Typically, these binaries are stored in/opt/cni/binon each node, and CNI executes this binary. In this case we’ve specified themacvlanbinary. If this is your first time installing Multus, you might want to verify that the plugins that are in the “type” field are actually on disk in the/opt/cni/bindirectory.ipam: IP address allocation configuration. Thetypecan an be the following:dhcp: Runs a daemon on the host to make DHCP requests on behalf of a containerhost-local: Maintains a local database of allocated IPsstatic: Allocates static IPv4/IPv6 addresses to containers- whereabouts: A CNI IPAM plugin that assigns IP addresses cluster-wide
NetworkAttachmentDefinition CNI Types
Bridge:
This acts as a network switch between multiple pods on the same node host. In its current form, a bridge interface is created that does not link any physical host interface. As a result, connections are not made to any external networks including other pods on the other host nodes:
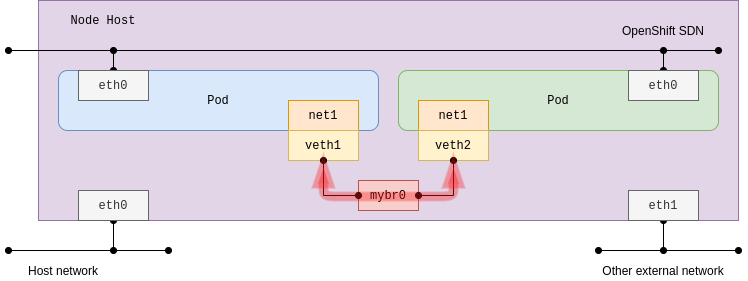
Configure the bridge plug-in with host-local IPAM. The default bridge name is cni0 by default if the name is not specified using bridge parameter:
apiVersion: "k8s.cni.cncf.io/v1"
kind: NetworkAttachmentDefinition
metadata:
  name: bridge-conf
spec:
  config: '{
      "cniVersion": "0.3.1",
      "type": "bridge",
      "bridge": "mybr0",
      "ipam": {
          "type": "host-local",
          "subnet": "192.168.12.0/24",
          "rangeStart": "192.168.12.10",
          "rangeEnd": "192.168.12.200"
      }
    }'
Host-device:
This plug-in makes a physical host interface move to a pod network namespace. When enabled, the specified host interface disappears in the root network namespace (default host network namespace). This behavior might affect re-creating the pod in place on the same host as the host interface may not be found as it is specified by host-device plug-in configuration.
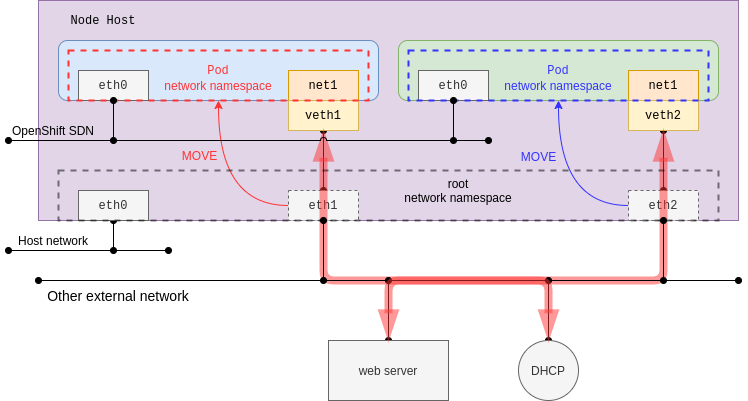
This time, dhcp IPAM is configured, and it would trigger the creation of the dhcp-daemon daemonset pods. The pod in daemon mode listens for an address from a DHCP server on Kubernetes, whereas the DHCP server itself is not provided. In other words, it requires an existing DHCP server in the same network. This demonstration shows you the MAC address of the parent is kept in the pod network namespace. Additionally, the source IP and MAC address can be identified by using an external web server access test.
Add the following configurations:
apiVersion: "k8s.cni.cncf.io/v1"
kind: NetworkAttachmentDefinition
metadata:
  name: host-device
spec:
  config: '{
      "cniVersion": "0.3.1",
      "name": "host-device-main",
      "type": "host-device",
      "device": "enp0s9",
      "ipam": {
          "type": "dhcp"
      }
    }'
ipvlan:
The ipvlan plug-in may be used in the event that there are limited MAC addresses that can be used. This issue is common on some switch devices that restrict the maximum number of MAC addresses per physical port due to port security configurations. When operating in most cloud providers, you should consider using ipvlan instead of macvlan as unknown MAC addresses are forbidden in VPC networks:
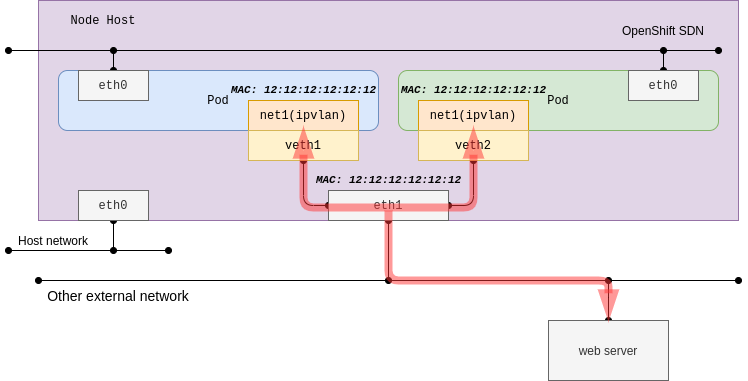
The sub-interface of the ipvlan can use distinct IP addresses with the same MAC address of the parent host interface. So, it would not work well with a DHCP server which depends on the MAC addresses. Parent host interface acts as a bridge (switch) with L2 mode, and it acts as a router with L3 mode of the ipvlan plug-in.
apiVersion: "k8s.cni.cncf.io/v1"
kind: NetworkAttachmentDefinition
metadata:
  name: ipvlan
spec:
  config: '{
   "cniVersion": "0.3.1",
   "name": "ipvlan-main",
   "type": "ipvlan",
   "mode": "l2",
   "master": "enp0s9",
     "ipam": {
          "type": "host-local",
          "subnet": "172.17.9.0/24",
          "rangeStart": "172.17.9.201",
          "rangeEnd": "172.17.9.205",
          "gateway": "172.17.9.1"
     }
   }'
Macvlan:
With macvlan, it’s simple to use as it aligns to traditional network connectivity. Since the connectivity is directly bound with the underlying network using sub-interfaces each having MAC address.
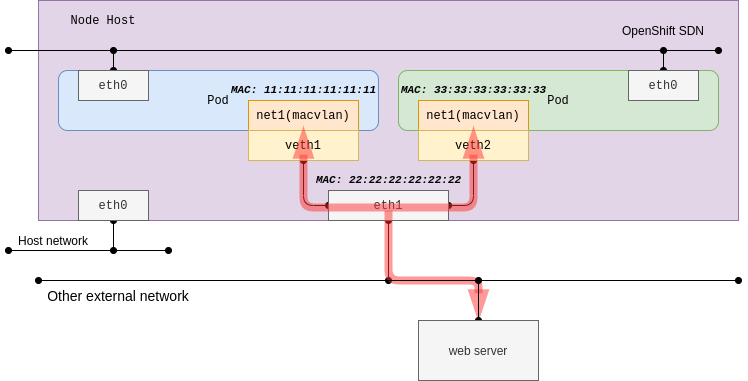
macvlan generates MAC addresses per the sub-interfaces, and in most cases, Public Cloud Platforms are not allowed due to their security policy and Hypervisors have limited capabilities. For the RHV (Red Hat Virtualization) use case, you will need to change No network filter on your network profile before executing the test. For vSwitch in vSphere environments, similar relaxed policies need to be applied. The test procedure is almost the same as ipvlan, so it is easy to compare both plug-ins.
Macvlan has multiple modes. In this example, bridge mode will be configured. Refer to MACVLAN documentation for more information on the other mode which will not be demonstrated.
apiVersion: "k8s.cni.cncf.io/v1"
kind: NetworkAttachmentDefinition
metadata:
  name: macvlan
spec:
  config: '{
    "cniVersion": "0.3.1",
    "name": "macvlan-main",
    "type": "macvlan",
    "mode": "bridge",
    "master": "enp0s9",
      "ipam": {
            "type": "static"
      }
    }'
Creating a pod that attaches an additional interface
Deploy a IPVLAN Type NetworkAttachmentDefinition:
cat <<EOF | kubectl create -f -
apiVersion: "k8s.cni.cncf.io/v1"
kind: NetworkAttachmentDefinition
metadata:
  name: ipvlan-def
spec:
  config: '{
      "cniVersion": "0.3.1",
      "type": "ipvlan",
      "master": "enp0s9",
      "mode": "l2",
      "ipam": {
        "type": "host-local",
        "subnet": "192.168.200.0/24",
        "rangeStart": "192.168.200.201",
        "rangeEnd": "192.168.200.205",
        "gateway": "192.168.200.1"
      }
    }'
EOF
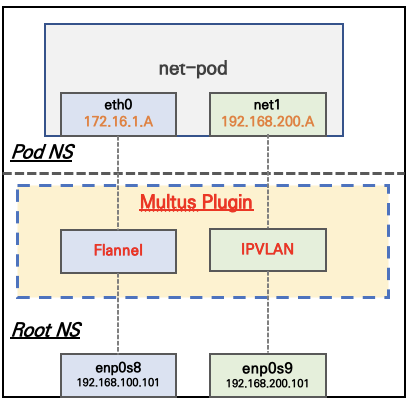
Let’s go ahead and create a pod (that just sleeps for a really long time) with this command:
cat <<EOF | kubectl create -f -
apiVersion: v1
kind: Pod
metadata:
  name: net-pod
  annotations:
    k8s.v1.cni.cncf.io/networks: ipvlan-def
spec:
  containers:
  - name: netshoot-pod
    image: nicolaka/netshoot
    command: ["tail"]
    args: ["-f", "/dev/null"]
  terminationGracePeriodSeconds: 0
---
apiVersion: v1
kind: Pod
metadata:
  name: net-pod2
  annotations:
    k8s.v1.cni.cncf.io/networks: ipvlan-def
spec:
  containers:
  - name: netshoot-pod
    image: nicolaka/netshoot
    command: ["tail"]
    args: ["-f", "/dev/null"]
  terminationGracePeriodSeconds: 0
EOF
Check the ips in the pod:
kubectl exec -it net-pod -- ip addr
1: lo: <LOOPBACK,UP,LOWER_UP> mtu 65536 qdisc noqueue state UNKNOWN group default qlen 1000
    link/loopback 00:00:00:00:00:00 brd 00:00:00:00:00:00
    inet 127.0.0.1/8 scope host lo
       valid_lft forever preferred_lft forever
    inet6 ::1/128 scope host
       valid_lft forever preferred_lft forever
3: eth0@if10: <BROADCAST,MULTICAST,UP,LOWER_UP> mtu 1450 qdisc noqueue state UP group default
    link/ether 06:56:cf:cb:3e:75 brd ff:ff:ff:ff:ff:ff link-netnsid 0
    inet 10.244.0.5/24 brd 10.244.0.255 scope global eth0
       valid_lft forever preferred_lft forever
    inet6 fe80::456:cfff:fecb:3e75/64 scope link
       valid_lft forever preferred_lft forever
4: net1: <BROADCAST,MULTICAST,UP,LOWER_UP> mtu 1500 qdisc noqueue state UNKNOWN group default
    link/ether 08:00:27:a0:41:35 brd ff:ff:ff:ff:ff:ff
    inet 192.168.200.201/24 brd 192.168.200.255 scope global net1
       valid_lft forever preferred_lft forever
    inet6 fe80::800:2700:1a0:4135/64 scope link
       valid_lft forever preferred_lft forever

kubectl exec -it net-pod2 -- ip addr
1: lo: <LOOPBACK,UP,LOWER_UP> mtu 65536 qdisc noqueue state UNKNOWN group default qlen 1000
    link/loopback 00:00:00:00:00:00 brd 00:00:00:00:00:00
    inet 127.0.0.1/8 scope host lo
       valid_lft forever preferred_lft forever
    inet6 ::1/128 scope host
       valid_lft forever preferred_lft forever
3: eth0@if9: <BROADCAST,MULTICAST,UP,LOWER_UP> mtu 1450 qdisc noqueue state UP group default
    link/ether 8e:8f:68:f8:80:2c brd ff:ff:ff:ff:ff:ff link-netnsid 0
    inet 10.244.0.4/24 brd 10.244.0.255 scope global eth0
       valid_lft forever preferred_lft forever
    inet6 fe80::8c8f:68ff:fef8:802c/64 scope link
       valid_lft forever preferred_lft forever
4: net1: <BROADCAST,MULTICAST,UP,LOWER_UP> mtu 1500 qdisc noqueue state UNKNOWN group default
    link/ether 08:00:27:a0:41:35 brd ff:ff:ff:ff:ff:ff
    inet 192.168.200.202/24 brd 192.168.200.255 scope global net1
       valid_lft forever preferred_lft forever
    inet6 fe80::800:2700:2a0:4135/64 scope link
       valid_lft forever preferred_lft forever
Ping test:
# ping own ip
kubectl exec -it net-pod -- ping -c 1 -I net1 192.168.200.201
PING 192.168.200.201 (192.168.200.201) from 192.168.200.201 net1: 56(84) bytes of data.
64 bytes from 192.168.200.201: icmp_seq=1 ttl=64 time=0.024 ms

--- 192.168.200.201 ping statistics ---
1 packets transmitted, 1 received, 0% packet loss, time 0ms
rtt min/avg/max/mdev = 0.024/0.024/0.024/0.000 ms

# ping net-pod2's ip
kubectl exec -it net-pod -- ping -c 1 -I net1 192.168.200.201
PING 192.168.200.202 (192.168.200.202) from 192.168.200.201 net1: 56(84) bytes of data.
64 bytes from 192.168.200.202: icmp_seq=1 ttl=64 time=0.040 ms

--- 192.168.200.202 ping statistics ---
1 packets transmitted, 1 received, 0% packet loss, time 0ms
rtt min/avg/max/mdev = 0.040/0.040/0.040/0.000 ms

# ping dw
kubectl exec -it net-pod -- ping -c 1 -I net1 192.168.200.10
PING 192.168.200.1 (192.168.200.1) from 192.168.200.201 net1: 56(84) bytes of data.
64 bytes from 192.168.200.1: icmp_seq=1 ttl=64 time=0.217 ms

--- 192.168.200.1 ping statistics ---
1 packets transmitted, 1 received, 0% packet loss, time 4ms
rtt min/avg/max/mdev = 0.217/0.217/0.217/0.000 ms